
Molto2 USB Config Tool
TOKEN2 Molto2 USB Config Tool QT.0.6 -
A desktop application for provisioning, configuring and managing TOKEN2 Molto2 programmable TOTP hardware tokens over USB.
This version has been rewritten using Python with QT to create the GUI part. You can also use command-line tool or the legacy apps (v0.5 or lower) if needed.
Getting Started
System Requirements
| Component | Requirement |
|---|---|
| Operating System | Windows 10/11 (64-bit) or macOS 12+ |
| Hardware | TOKEN2 Molto2 token connected via USB |
| Smart Card Service | Windows Smart Card service (auto) or macOS pcscd |
| CCID Driver (macOS) | Not required / included in macOS 26 Tahoe |
Installation
- Download the Windows .exe from the Downloads section below.
- This is a portable application and does not need to be installed
- Plug in your TOKEN2 Molto2 token via USB. Windows will load the built-in CCID driver automatically.
- Launch TOKEN2 Molto2 Config Tool application.
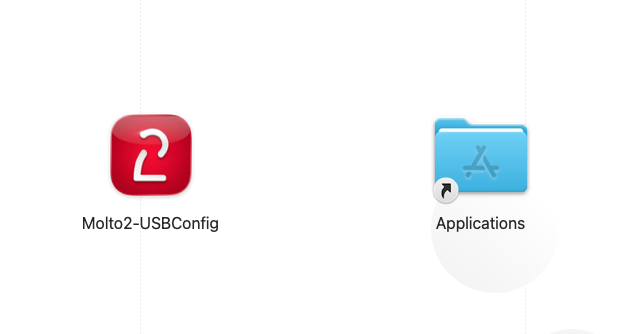
- Download the macOS
.dmgfrom the Downloads section below. - Open the disk image and drag the application into Applications.
- For older systems, a CCID Driver may need to be installed. Contact us for assistance.
- Plug in your TOKEN2 Molto2 token via USB. The status bar will turn green when connected.
Interface Layout
The application window is organised into three persistent zones visible at all times, plus a tabbed workspace in the center.

| Zone | Description |
|---|---|
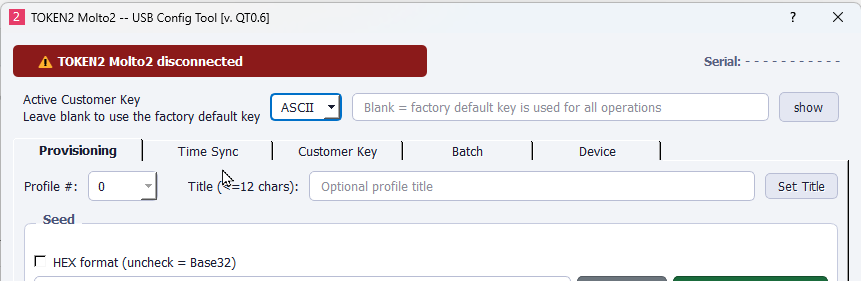
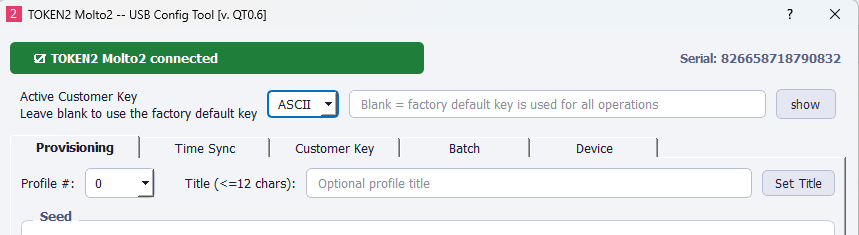
| Device Status (top) | Shows device connection state (green = connected, red = disconnected) and the serial number of the connected device. |
| Customer Key Bar | Persistent input for the customer key used to authenticate all operations. Supports ASCII and HEX formats. Masked by default. |
| Tab Area | Five tabs: Provisioning, Time Sync, Customer Key, Batch, and Device. |
Device Connection
The app polls for a TOKEN2 reader every 2 seconds. When a Molto2 device is detected it reads the serial number and enables all tabs. When the device is removed the status bar turns red and all tabs are disabled until re-connection.
Active Customer Key
Every operation — writing seeds, applying config, syncing time, locking, and factory reset — requires the device to be authenticated with a customer key. The key bar is always visible at the top of the window.
| Field | Description |
|---|---|
| Format selector | Choose ASCII (16 printable characters) or HEX (32 hex characters). |
| Key input | Enter the customer key currently programmed on this device. Leave blank to use the factory default key. |
| Show / Hide | Toggle password masking on the key field. |
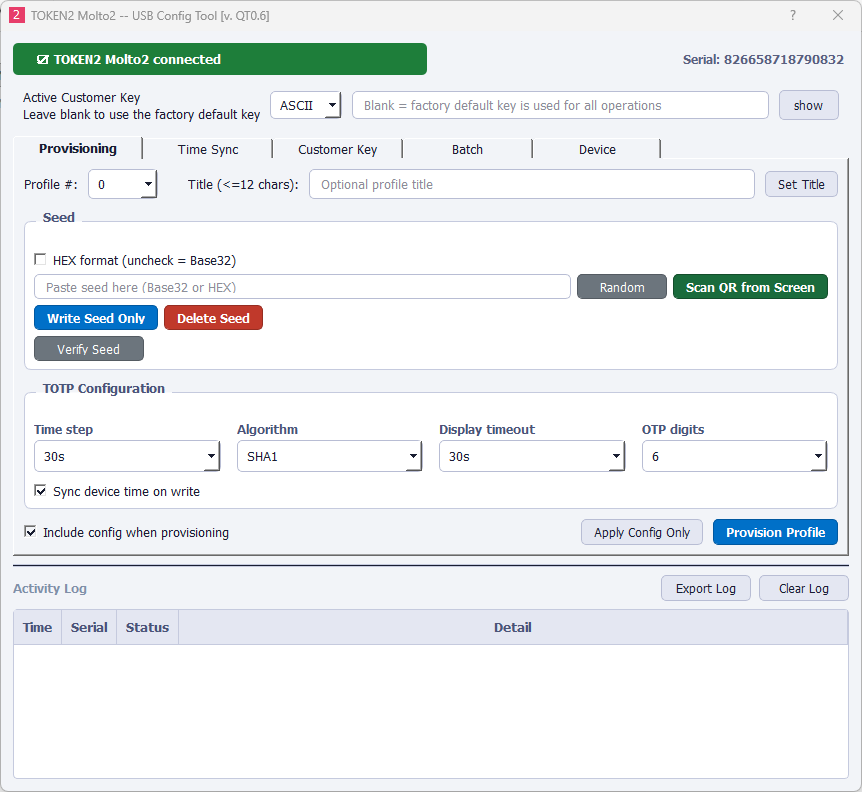
Provisioning Tab
The Provisioning tab is the primary workspace. It lets you write a TOTP seed to a profile slot, set a display title, configure the OTP parameters, and verify the result — all from one screen.
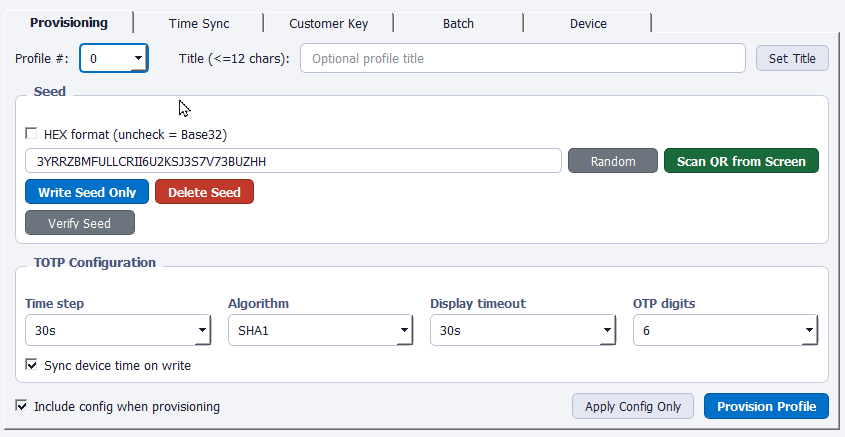
Profile Selection
The Molto2 supports 100 profile slots (numbered 0–99). Select the target slot from the Profile # dropdown at the top. You can also give the profile an optional title of up to 12 characters, which is displayed on the device screen.
Seed Input
The Seed group contains the secret key that the device uses to generate TOTP codes. Seeds can be entered in Base32 (default) or HEX format.
| Button | Action |
|---|---|
| Random | Generates a cryptographically secure 20-byte seed and inserts it as Base32. Copy this into your authenticator service before writing to the device. |
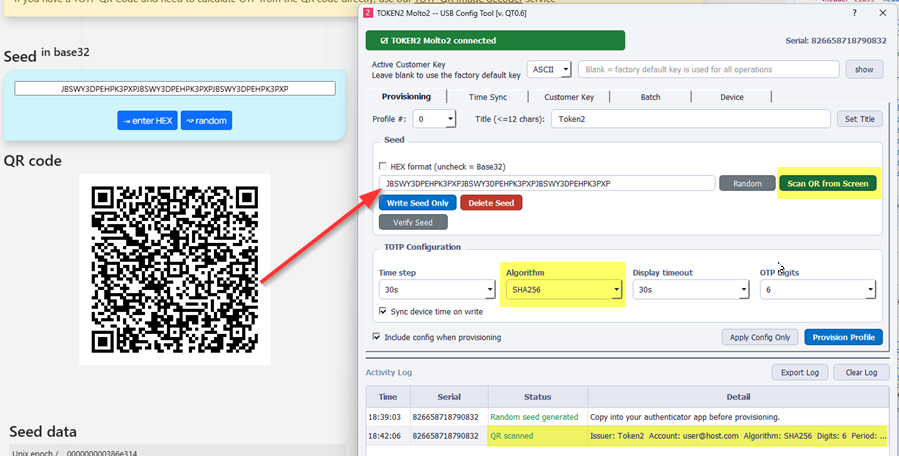
| Scan QR from Screen | Captures all monitors and decodes the first visible otpauth://totp QR code. Fills the seed, algorithm, digits, period, and title automatically. |
| Write Seed Only | Writes the seed to the selected profile without changing TOTP configuration. |
| Delete Seed | Permanently removes the seed from the selected profile. Other settings are kept. |
Scan QR from Screen
Click Scan QR from Screen to capture all connected displays and decode a TOTP QR code. The tool searches for otpauth:// URIs and automatically fills in the seed, algorithm, digit count, time step, and profile title from the decoded data. This is the fastest way to enrol a new service.
TOTP Configuration
The configuration group sets the OTP parameters that the device will use for the selected profile:
| Setting | Options | Default |
|---|---|---|
| Time step | 30s, 60s | 30s |
| Algorithm | SHA1, SHA256 | SHA1 |
| Display timeout | 15s, 30s, 60s, 120s | 30s |
| OTP digits | 4, 6, 8, 10 | 6 |
The Sync device time on write checkbox (enabled by default and recommended) writes the current PC UTC time to the device when provisioning. This keeps the device clock aligned with the server.
Provisioning Actions
| Button | Behaviour |
|---|---|
| Provision Profile | This is the button you use in the vast majority of use cases. Writes the config (if "Include config" is checked), then the seed and title in a single workflow. This is the recommended one-click action. |
| Apply Config Only | Sends only the TOTP configuration (algorithm, digits, time step, display timeout, and time sync) without touching the seed. |
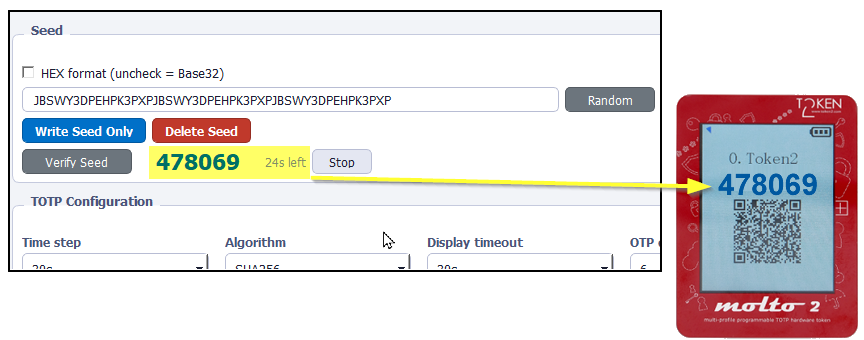
Seed Verification
After writing a seed you can verify it matches by clicking Verify Seed. This opens a live TOTP dialog that computes a code from the seed field using the current configuration settings. Compare the displayed code with the code shown on the physical device — if they match, the seed was written correctly.
Time Sync Tab
TOTP tokens depend on an accurate clock. If the device's internal RTC drifts, OTP codes will stop matching. The Time Sync tab writes the current UTC time from your PC to the device.
| Button | Action |
|---|---|
| Sync This Profile | Updates the clock for the selected profile slot only. |
| Sync ALL Profiles | Iterates through every slot (0–99) and writes the current time. This may take a few seconds. Confirmation is required. |
Customer Key Tab
This tab changes the customer key stored on the device. The current key (entered in the key bar at the top) is used to authenticate the change, and the new key is sent encrypted.
- Select the key format — ASCII (16 characters) or HEX (32 hex characters).
- Enter the new key.
- Click Set New Customer Key and confirm the dialog.
- Press the UP button on the physical device to confirm the change.
- Update the Active Customer Key bar at the top with the new key for subsequent operations.
Batch Provisioning Tab
The Batch tab provisions multiple profiles in one run using a CSV file. This is useful for deploying many TOTP secrets to a single device at once.

Workflow
- Click Browse CSV… and select your file — or click Sample Data to load test rows.
- Review the preview table. Duplicate profile numbers are flagged and will block the run.
- Optionally check Apply TOTP config from CSV and/or Sync device time for each profile.
- Click Run Batch Provisioning and confirm. A progress bar tracks each profile.
- Results appear in the Activity Log at the bottom. The status label shows success/failure counts.
CSV File Format
The CSV must have a header row. Column names are case-insensitive.
| Column | Required | Description |
|---|---|---|
profile | Yes | Profile slot number (0–99). Must be unique within the file. |
seed | Yes | The TOTP secret. Base32 by default, or HEX if seedformat column is set to hex. |
title | No | Display title (max 12 characters). |
algorithm | No | SHA1 or SHA256. Default: SHA1. |
digits | No | 4, 6, 8, or 10. Default: 6. |
period | No | 30 or 60 (seconds). Default: 30. |
seedformat | No | base32 (default) or hex. |
Example CSV
profile,seed,title,algorithm,digits,period
2,JBSWY3DPEHPK3PXP,Google,SHA1,6,30
3,IFZGQ2DPN5XW233P,GitHub,SHA1,6,30
4,KZNCCOVDFA7P2KSTHSMRUQRDERCJDSPT3TDLFI4DRZGHLJNU,AWS,SHA256,6,60
Device Tab
Screen Lock / Unlock
Firmware v2.1 and above supports locking the device display. When locked, OTP codes are not shown on the screen until unlocked via this tool. This is useful for protecting devices during transport or storage.
Factory Reset
Activity Log
The Activity Log at the bottom of the window records every action with a timestamp, device serial, status, and detail message. Successful operations are shown in green; failures in red.
| Button | Action |
|---|---|
| Export Log | Saves the entire log to a .csv file with columns: Time, Serial, Status, Detail. |
| Clear Log | Removes all rows from the log table. This does not affect any exported files. |
Troubleshooting
If the status bar stays red after plugging in the device:
- Try a different USB port or cable.
- Windows: Open Services (services.msc) and ensure Smart Card is running.
- macOS: Verify the CCID driver was installed on first launch. Re-launch the app to trigger the driver prompt if needed.
- Ensure no other smart-card application is holding an exclusive connection to the reader.
The error "Authentication failure, attempts left: N" means the customer key entered in the key bar does not match the key on the device. Double-check the key value and format (ASCII vs HEX). After multiple failures the device may lock — consult TOKEN2 support if this happens.
If the code on the device doesn't match your authenticator, the most common cause is clock drift. Go to the Time Sync tab and sync the affected profile (or all profiles). Also confirm that the algorithm, digit count, and time step match the service's requirements.
QR scanning requires the optional Python packages zxing-cpp, mss, and Pillow. These dependencies are automatically included in bundled desktop builds.
For reliable scanning, make sure the QR code is fully visible, large enough, and not obscured by other windows or overlays.
On macOS, the system will prompt you to grant Screen Recording permission before QR scanning can work. If scanning fails, you can manually enable this permission in:
System Settings → Privacy & Security → Screen & Audio Recording
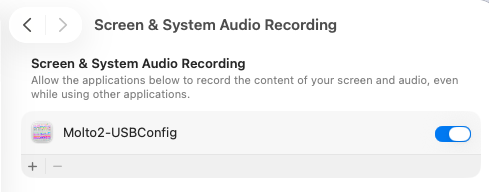
After granting access, restart the application and try scanning again.
Download
Download the latest version for your operating system.
Subscribe to our mailing list
Want to keep up-to-date with the latest Token2 news, projects and events? Join our mailing list!