
Using Token2 classic tokens for MultiOTP Windows workstation login
In this article, we'll show you how to implement two-factor authentication for users on a Windows domain using the multiOTP open source product. MultiOTP is a set of php scripts and utilities that implements the OATH protocol for HOTP/TOTP (Time-based One Time Password). It is possible to use both in Windows and via RADIUS to implement 2FA in almost anything. After the implementation of multiOTP for user login, Windows will request an additional one-time password (OTP - one time password), which the user must receive from the display of hardware token. You can set up two-factor authentication for logging into Windowsworkstations, or for remote RDP access to RDS hosts on a Windows Server. The main advantage of multiOTP is that it does not require internet access and can be used to implement two-factor user authentication in isolated networks.
Most analogues are paid or require direct access to the Internet.
All Token2 hardware tokens are fully compatible with this product. There are different type of devices that can be used:
1. Programmable tokens
2. Classic tokens
3. HOTP Usb keys
Implementation MFA with Classic tokens
Token2 provides classic OATH compliant TOTP tokens, which come from the factory with a hard-coded secret key that can't be changed. To see our classic tokens use this link.Prerequisites:
• Token2 Classic hardware token (for example, C202)
• CSV file for your token device(s). You can request the CSV file from your order page after successful delivery
• multiOTP server deployed on Windows Server 2016 (You can also deploy multiOTP using a ready-made OVA for VMware, a Hyper-V virtual machine, or a Docker container)
• Active Directory deployed on Windows Server 2016(or other)
• Windows client pc(member of domain)
Installing and configuring MultiOTP in an Active Directory domain
Active Directory settings:Let's start by configuring a MultiOTP server that will fetch users from Active Directory, generate unique QR codes for users, and validate the second factor.
We create a separate group in Active Directory and add users to it, for which we will require verification of the second factor when logging into Windows.
For example: 2FAUsersGroup. Then add users to this group(Token2User1, Token2User2, Token2User3)
Create a new user in AD, multiotp_srv, which will be used by multiotp to access AD (with minimal privileges).
MultiOTP server settings:
Download the archive with MultiOTP files from the developers' website https://download.multiotp.net/.
Open the multiotp_5.8.2.9.zip archive and extract the windows directory from it to a folder on your local drive (C:\MultiOTP).
Open a command prompt and navigate to the directory containing the multiotp.exe utility:
CD C:\MultiOTP\windows
With the following commands, we will configure MultiOTP to get users from the LDAP Active Directory:
multiotp -config default-request-prefix-pin=0
multiotp -config default-request-ldap-pwd=0
multiotp -config ldap-server-type=1
multiotp -config ldap-cn-identifier="sAMAccountName"
multiotp -config ldap-group-cn-identifier="sAMAccountName"
multiotp -config ldap-group-attribute="memberOf"
multiotp -config ldap-ssl=0
multiotp -config ldap-port=389
multiotp -config ldap-domain-controllers=dc01.token2.ch,ldap://192.168.1.245:389
multiotp -config ldap-base-dn="DC=token2,DC=ch"
Account for multiotp authentication in AD:
multiotp -config ldap-bind-dn="CN=multiotp_srv,CN=USERS,DC=token2,DC=ch"
multiotp -config ldap-server-password="P@ssw0rd!"
multiotp -config ldap-network-timeout=10
multiotp -config ldap-time-limit=30
multiotp -config ldap-activated=1
Key to access MultiOTP server:
multiotp -config server-secret=SecretKey!!!
A more detailed description of all options is in the document https://download.multiotp.net/readme_5.8.2.9.txt in the section
“HOW TO CONFIGURE MULTIOTP TO SYNCHRONIZE THE USERS FROM AN ACTIVE DIRECTORY”.
Previously, we created the 2FAUsersGroup group and added users to it. Synchronize AD users in MultiOTP:
multiotp -debug -display-log -ldap-users-sync
To regularly synchronize new accounts in Active Directory, you need to create a scheduler task with the above command.
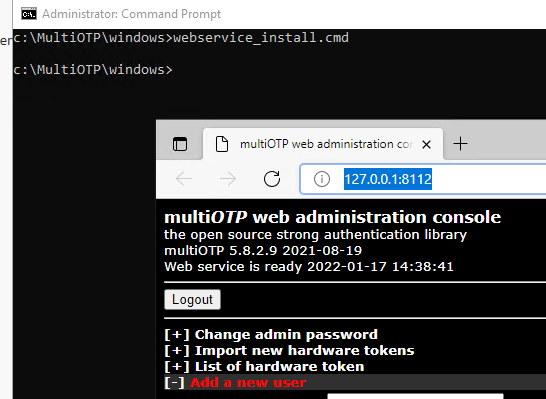
Run the webservice_install.cmd file with administrator rights. This will install the MultiOTP web management interface.
Go to the web interface http://127.0.0.1:8112/ under the admin account with a password of 1234 (it is advisable to change it at the initial login).
To use classic tokens with MultiOTP as 2FA for domain users use steps below:
1)Import token(s) from CSV file. The CSV file sent by Token2 contains tokens with seeds in the following form:
serial_number;manufacturer;algorithm;seed;digits;interval_or_event
make sure you select the correct seed format when requesting the seeds. Also, please note that this format may change as the developers of multiOTP announce that they will expand the structure of the CSV file by adding a username to it in future releases.
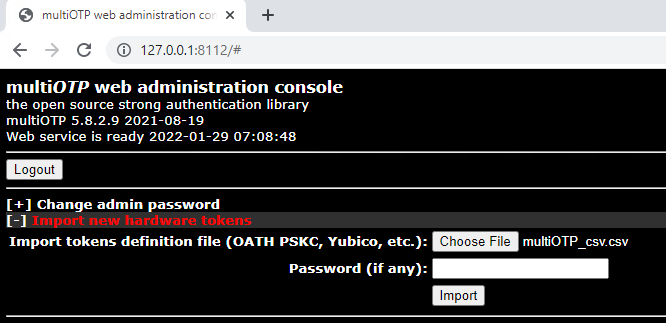
Go to Import new hardware tokens , select the CSV file with tokens and click Import :
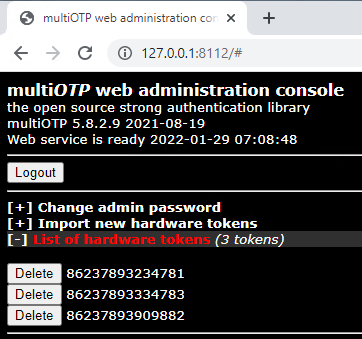
After the successful uploading CSV file, you can see tokens in List of hardware tokens list (identification is by serial number of token):
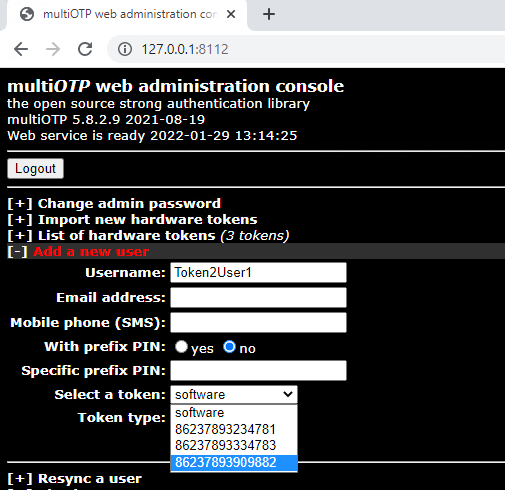
2) Create user(s) in Multiotp (username has to be equal to UPN of active directory user). Go to Add a new user , type username and choose
the required token from the list and then click Add this user button. You can also specify special prefix pin which must be entered
together(as prefix) with generated otp.We do not user prefix in our example.
When the new user has been created ,from the command line, you can check that MultiOTP allows you to authenticate a given user using OTP:
multiotp.exe -display-log Token2User1 764881 ( 764881- is otp generated by the token)
LOG 2022-01-17 15:13:11 notice (user Token2User1) User OK: User Token2User1 successfully logged in with TOTP token.
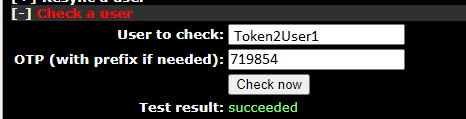
You can also check the correct operation of OTP from the web interface. Go to the Check a user section, enter your username and one-time password:
Installing multiOTP CredentialProvider on Windows
The next step is to install the multiOTP CredentialProvider on the Windows computers where you want to implement two-factor user authentication with MultiOTP. CredentialProvider can be installed on all versions of Windows 7/8/8.1/10/11 and Windows Server 2012(R2)/2016/2019/2022.
In this example, we will set up two-factor authentication on Windows 10(it is a member of domain Token2.ch)
Download and install multiOTP CredentialProvider from GitHub https://github.com/multiOTP/multiOTPCredentialProvider/releases. At the time of writing, this version is 5.8.4.0.
Run the installation:
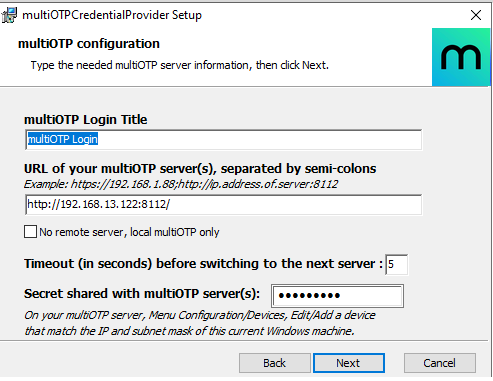
1) Specify the IP of the server where multiOTP was installed .
Don't forget to open the firewall port on the multiOTP server and client. You can do this using powershell :
New-NetFirewallRule -DisplayName "AllowMultiOTP" -Direction Inbound -Protocol TCP –LocalPort 8112 -Action Allow
2) Enter the secret word from the multiOTP configuration (in our example it is SecretKey!!!)
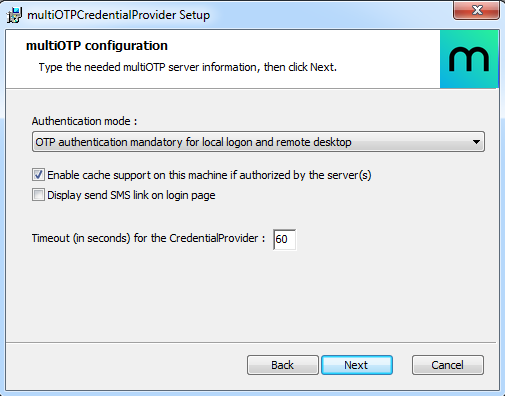
3) Select the Windows logon type that you want to use OTP authentication for. In our example, we use 2FA for Windows logon
(OTP authentication mandatory for local logon and remote desktop).
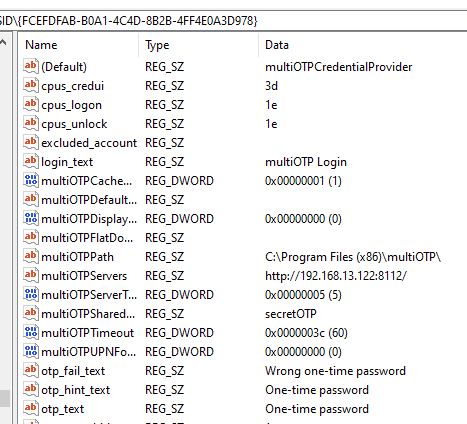
The MultiOTP CredentialProvider stores settings in the HKEY_CLASSES_ROOT\CLSID\{FCEFDFAB-B0A1-4C4D-8B2B-4FF4E0A3D978} registry.
If necessary, you can change the CredentialProvider settings here without reinstalling.
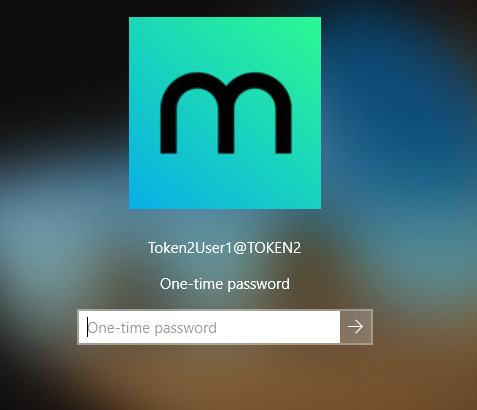
Restart the PC and after submitting the username and password, an additional one-time password window appears:
On the MultiOTP server, you can enable logging, this is useful when debugging:
multiotp -config debug=1
multiotp -config display-log=1
Don't forget to make sure that your domain synchronizes time with time-servers on the Internet and the time on clients does not scatter. These are critical to the operation of OTP.
Please note in case of having significant problems logging in with MultiOTP, you can uninstall CredentialProvider in safe mode.
Subscribe to our mailing list
Want to keep up-to-date with the latest Token2 news, projects and events? Join our mailing list!